Integration with payment gateways
Smarty allows you to connect third-party payment gateways to receive payments from subscribers through applications or in your personal account on the site. This is an additional feature and expands the capabilities of built-in billing, but does not replace specialized solutions.
Payment gateways are integrated with Smarty according to the following scheme:
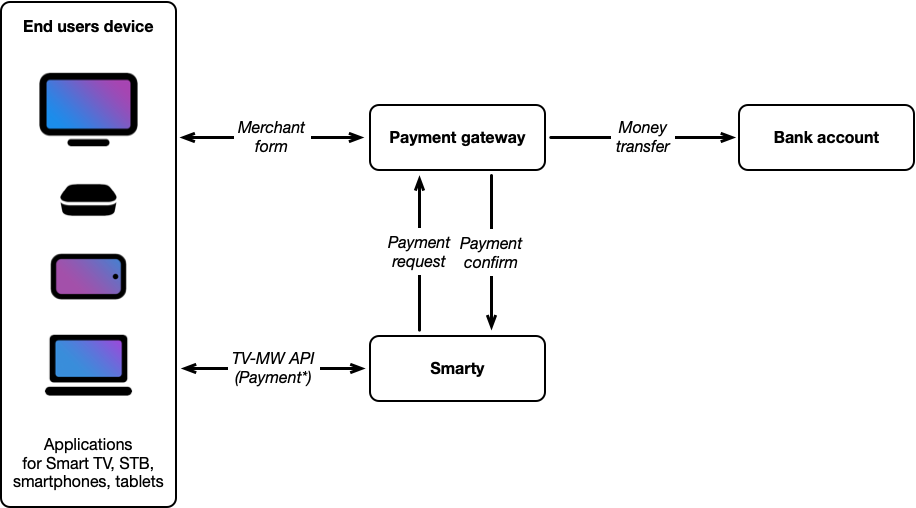
A payment gateway is a third-party service, a company specializing in payment processing. The operator must conclude a contract with a particular payment gateway, and then configure the integration in Smarty.
The payment gateway provides an API for creating and confirming payments, as well as a payment form (merchant) for entering these cards or selecting other payment methods.
In order for the payment gateway to be used within the application, the gateway must develop a payment form adapted for all devices (especially for TV platforms) for your service.
Thus, the scheme of interaction can be described as follows:
- The subscriber opens the "Payment" section in the application, or in the personal account on the site. The payment function should be activated in the application assembly options, included in the personal account, and integration with a particular payment gateway should be configured.
- The application sends a request to Smarty, Smarty generates the URL of the payment page on the gateway side.
- The application opens the payment page from the gateway server.
- The subscriber indicates the payment data and initiates payment.
- The application sends a request to Smarty.
- Smarty sends a request to the payment gateway.
- The payment gateway processes the payment. When payment is confirmed, the gateway sends a request to Smarty to confirm the transaction.
- When receiving a confirmation request, Smarty updates the internal balance of the subscriber, connects the service / extends the period.
- According to the terms of the contract, the payment gateway periodically transfers funds to the account of the operator.
During the initial payment, if the payment gateway supports recurrent payments, the subscriber can link the card for auto payment. At the start of the team make_autopayments Smarty initiates payment on tied cards automatically.
3DS Authorization
By default, when paying with a card, the bank uses 3DS authorization to confirm the transaction, as a rule, for this, the card owner must enter a one-time code received in SMS.
One-time code entry forms are usually not adapted for TVs, so when using such authorization, the subscriber will not be able to enter the code, and in some cases will not be able to close the bank page and return to the application.
To solve this problem, it is recommended to disable 3DS authorization in agreement with the payment gateway and the bank. This option is available, but increases the cost of processing services.
Payment
| Possibility to pay with TV | Yes |
| Possibility of payment from mobile devices | Yes |
| Possibility of payment in the personal account | Yes |
| Support for payment from card | Yes |
| Ability to disable 3DS | Yes |
| Support for recurrent payments | Yes |
| Support for other payment methods (e-money, etc.) | No |
| Support for payment with SBP | Yes |
Payture is a payment gateway with the ability to bind and delete cards, as well as configure autopayment. Feature of the work – the payment form is located on the gateway side and opens inside the iframe element in the widget on the site or on the payment page in the application. There are currently 3 payment page templates:
- For payment in mobile and desktop browsers (standard form Payture). The template's name is Payture.
- For payment from an application inside a Smart TV or console (adapted for remote control, supported only on devices with TLS 1.2 and above). The name of the template is an empty line.
- For payment from the app inside the TV Samsung Smart TV under Orsay (downloads special plugins to interact with these devices). The template's name is Orsay.
Set up integration
To start accepting payments from subscribers using Payture, you must:
- In the section "Billing" → "Payment gateways" create an object with the type "Payture":
- Data for the fields "Host", "Pay Key", "Add Key", "VAT" must be obtained directly from the payment gateway after signing the contract with it.
- In the “Payment Page Template” field, specify one of the payment page templates (see description above). In the event that payment will be used using a widget on the site, it is recommended to specify the “Payture” template by default, and for payment inside the application on the TV, set the template through the configuration of the portal in the file
/etc/microimpuls/portal/client.js(parameter)template_of_payment_page). - In the “State of the ‘Remember Card’ option by default” field, specify the way the “Remember Card” option is displayed on the payment page.
- Set up a notification to Payture at: http://smarty.example.com/billing/payment/payture/validate_notify/ (Existing on the payment gateway on request, instead of smarty.example.com, you need to specify the address of your Smarty server).
- If necessary in the configuration file of the portal configure fields
merchant_typeandtemplate_of_payment_page(it is possible to fine-tune these fields depending on the devices). - Ensure the correctness of the payment form within the application, as well as in the payment widget on the site, if used.
Wallet One
| Possibility to pay with TV | Yes |
| Possibility of payment from mobile devices | * |
| Possibility of payment in the personal account | Yes |
| Support for payment from card | Yes |
| Ability to disable 3DS | No |
| Support for recurrent payments | No |
| Support for other payment methods (e-money, etc.) | Yes |
* Requires improvement under the operator.
Integration options:
- Wallet One – Different Payment Methods it is used to connect different payment methods (e-money, payment terminals, etc.) in the personal account.
- Wallet One - payment by card - is used to connect the form of payment by card.
Set up integration
To start accepting payments from subscribers using Wallet One, you must:
- In the Billing → → Payment Gateways section, create an object with the type “Wallet One – different payment methods” or “Wallet One – payment by card” and specify:
- The data for the Merchant ID, Private Key fields must be obtained directly from the payment gateway after signing the contract with it.
- In the field "Switching Address after successful payment" specify the URL of the page to which the transition will be made after successful payment (used only when paying in the personal account on the site).
- In the field "Switching Address after payment error" specify the URL of the page to which the transition will be made after unsuccessful payment (used only when paying in the personal account on the site).
- Configure Wallet One to confirm transactions on the URL: http://smarty.example.com/billing/payment/w1/result/ (It exists on the payment gateway side, instead of the smarty.example.com address, you need to specify the address of your Smarty server).
- If necessary in the configuration file of the portal configure the field
merchant_type(it is possible to fine-tune these fields depending on the devices).
PayPal
| Possibility to pay with TV | No |
| Possibility of payment from mobile devices | No |
| Possibility of payment in the personal account | Yes |
| Support for payment from card | Yes |
| Ability to disable 3DS | No |
| Support for recurrent payments | No |
| Support for other payment methods (e-money, etc.) | No |
Set up integration
To start accepting payments from subscribers using Paypal, you must:
- In the section "Billing" → "Payment gateways" create an object with the type "Paypal" and specify:
- The data for the Merchant ID, Private Key fields must be obtained directly from the payment gateway after signing the contract with it.
- In the field "Switching Address after successful payment" specify the URL of the page to which the transition will be made after successful payment (used only when paying in the personal account on the site).
- In the field "Switching Address after payment error" specify the URL of the page to which the transition will be made after unsuccessful payment (used only when paying in the personal account on the site).
- Configure Paypal payment confirmation address on the URL: http://smarty.example.com/billing/payment/paypal/result/ (It exists on the payment gateway side, instead of the smarty.example.com address, you need to specify the address of your Smarty server).
To transfer the PayPal gateway to test mode, you can use the option PAYPAL_SANDBOX_MODE. With the value of True, there is a transition to the test mode (sandbox mode). Data type: bool. By default False.
Fortebank
| Possibility to pay with TV | Yes |
| Possibility of payment from mobile devices | Yes |
| Possibility of payment in the personal account | No |
| Support for payment from card | Yes |
| Ability to disable 3DS | Yes |
| Support for recurrent payments | Yes |
| Support for other payment methods (e-money, etc.) | No |
Fortebank is a payment gateway with the ability to bind and delete cards, as well as configure autopayment. Payment is possible both with the help of the form built into the application and with the help of the bank’s payment widget (the latter must be built into the site or application yourself, there is no support for the widget in the application).
Set up integration
To start accepting payments from subscribers using Fortebank, you must:
- In Smarty, go to General Settings → General Client Settings and in the Default Payment Method and Default Card Payment Method fields, select Fortbank.
- In the section "Billing" → "Payment gateways" create an object with the type "Fortebank":
- The data for the username, password and host URL fields must be obtained directly from the payment gateway after signing the contract with it.
- In the field “Switching Address after successful payment” specify the URL of the page to which the transition will be made in case of successful payment. If payment is made only from the TV screen, the field can be left empty.
- Set up the team's work
heck_payment_statusvalidation of payment statuses. - Ensure the correctness of the payment form within the application.
Arca
| Possibility to pay with TV | No |
| Possibility of payment from mobile devices | * |
| Possibility of payment in the personal account | Yes |
| Support for payment from card | Yes |
| Ability to disable 3DS | - |
| Support for recurrent payments | No |
| Support for other payment methods (e-money, etc.) | No |
* Requires improvement under the operator.
Set up integration
To start accepting payments from subscribers using ArCa.am, you must:
- In the Billing → Payment Gateways section, create an object with the ArCa type and specify:
- The data for the Merchant Login and Merchant Password fields must be obtained directly from the payment gateway after signing a contract with it.
- In the field "Switching Address after successful payment" specify the URL of the page to which the transition will be made after successful payment (used only when paying in the personal account on the site).
- In the field "Switching Address after payment error" specify the URL of the page to which the transition will be made after unsuccessful payment (used only when paying in the personal account on the site).
Paymaster
| Possibility to pay with TV | No |
| Possibility of payment from mobile devices | No |
| Possibility of payment in the personal account | Yes |
| Support for payment from card | No |
| Ability to disable 3DS | No |
| Support for recurrent payments | No |
| Support for other payment methods (e-money, etc.) | Yes |
Set up integration
To start accepting payments from subscribers using PayMaster, you must:
- In the section "Billing" → "Payment gateways" create an object with the type "PayMaster" and specify:
- Data for the fields “Merchant ID”, “Secret Key”, “Hash type” must be obtained directly from the payment gateway after signing a contract with it.
- In the field "Switching Address after successful payment" specify the URL of the page to which the transition will be made after successful payment (used only when paying in the personal account on the site).
- In the field "Switching Address after payment error" specify the URL of the page to which the transition will be made after unsuccessful payment (used only when paying in the personal account on the site).
- Configure the payment confirmation address on the URL in PayMaster: http://smarty.example.com/billing/payment/paymaster/validate_notify/ (It exists on the payment gateway side, instead of the smarty.example.com address, you need to specify the address of your Smarty server).
SquareUp
| Possibility to pay with TV | No |
| Possibility of payment from mobile devices | No |
| Possibility of payment in the personal account | Yes |
| Support for payment from card | - |
| Ability to disable 3DS | No |
| Support for recurrent payments | No |
| Support for other payment methods (e-money, etc.) | - |
Set up integration
To start accepting payments from subscribers using SquareUp, you must:
- Under Billing → Payment Gateways, create a “SquareUp” object and specify:
- Data for the fields Application ID, Location ID, Token must be obtained directly from the payment gateway after signing a contract with it.
- In the field "Switching Address after successful payment" specify the URL of the page to which the transition will be made after successful payment (used only when paying in the personal account on the site).
- In the field "Switching Address after payment error" specify the URL of the page to which the transition will be made after unsuccessful payment (used only when paying in the personal account on the site).
- Configure the payment confirmation address in SquareUp on the URL: http://smarty.example.com/billing/payment/squareup/process/ (It exists on the payment gateway side, instead of the smarty.example.com address, you need to specify the address of your Smarty server).
Stripe
| Possibility to pay with TV | Yes |
| Possibility of payment from mobile devices | No |
| Possibility of payment in the personal account | Yes |
| Support for payment from card | Yes |
| Ability to disable 3DS | Yes |
| Support for recurrent payments | Yes |
| Support for other payment methods (e-money, etc.) | No |
* It supports the formation of a QR code and displaying it on the TV screen, which leads to the payment form at WEB, as well as showing the form of entering these cards, but with a limited list of supported devices and provided that the portal works through the https protocol:
- WebOS and Android TV: if they use the version of chrome >= 52;
- Tizen TV: if the device has a release year strictly longer than 2017 (excluding 2017)
- All other devices are considered not supporting the Stripe form.
Set up integration
To start accepting payments from subscribers using Stripe, you must:
- In the section "Billing" → "Payment gateways" create an object with the type "Stripe":
- Data for the fields "Public key" and "Private key" must be obtained directly from the payment gateway after signing a contract with it.
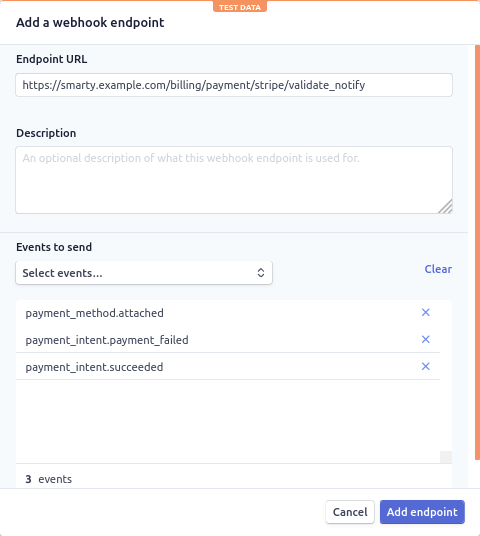
- In the personal account Stripe in the settings of webhooks add the address for notifications (Endpoint URL) type https://example.smarty.com/billing/payment/stripe/validate_notify with the following types of events:
payment_method.attached
payment_intent.payment_failed
payment_intent.succeeded
- Select on the General Settings page → General Client Settings the default payment method using the card – Stripe.
- Check the operability of the gateway in the widget for integration with the site "Personal Cabinet".
Viva
| Possibility to pay with TV | No |
| Possibility of payment from mobile devices | No |
| Possibility of payment in the personal account | Yes |
| Support for payment from card | Yes |
| Ability to disable 3DS | No |
| Support for recurrent payments | No |
| Support for other payment methods (e-money, etc.) | No |
Set up integration
To start accepting payments from subscribers using Viva, you must:
- Under Billing → Payment Gateways, create a Viva-type object and specify the following data: Merchant ID, Api Key, Smart Checkout Client ID and Smart Checkout Secret Key. Data should be taken from the corresponding fields in the LC Viva, section Settings -> Api access -> General. “Smart checkout Secret Key” will only be visible when you press the “Generate” button and will change the next time you click, so you need to copy it right away.
- Go to the Webhooks tab, add webhooks for the events "Transaction Payment Created" and "Order Updated" to /billing/payment/viva/result. Note that requests from Viva come via TLS 1.2, so the server that hosts Smarty must be configured accordingly.
The flag is responsible for transferring to sandbox or sale mode VIVA_DEMO_MODE.
Additional settings
Setting up auto payment
To set up auto payment, the following must be done:
- Prescribe in
client.jsoption'autopayment_enable': true - Add a team to the crown
make_autopayments
Each team launch will check subscribers with today’s deactivation date or renewal date 30 days ago and try to make a payment on the saved card.
Creating a payment widget
To create and configure a payment widget, you must perform the following:
- In the section “Content settings” → “Application directory”, create an application with the “Widget” type.
- Click on the field "URL / Name / Application ID" and select from the proposed options /templates/futuristic/default/apps/payment-widget/payment.widget.js
- Check the box in the paragraph "Show the application in the main menu".
- In the “Availability Options” section, note the templates and devices on which the widget should be displayed.
- Save it.
Configure payment by QR code for multiple servers
If the service architecture involves installing Smarty on multiple servers, then all requests related to QR codes must be processed on one server. To do this, you need to write the following in the Smarty configuration file in nginx:
location ~ /media/upload/tvmiddleware/qrcodes/
uwsgi_pass server_name;
location ~ /tvmiddleware/api/payment/qrcode/
uwsgi_pass server_name;
location ~ /api/tvmiddleware/api/payment/qrcode/
uwsgi_pass server_name;
Instead server you need to specify the name or address of the server.
Note
In the production environment, Stripe only works via https.